Homemade Calf Raise Machine
Calves are the hardest muscle to build. You walk around on them all day and toughen them up.
For full development you need to do standing and seated calf raises, in bare feet for a greater range of motion, and at least five sets of twenty five reps.
Seated calf raise machines start at $100, but I found an easy way to do these in my power rack.
Place your calf raise block inside your power rack cage. Sit on the end of a flat bench and place your bare feet on the calf raise block. Note the hole position you're knees are in at he lowest point of the exercise motion (at the bottom of the stretch). Place the saber spotters in this hole position of the rack. For me it's the number three hole.
Using a padded Olympic bar, from the lowest position, just roll the bar onto your knees and your good to go.
Standing calf raises are one of the best overall calf exercises. There is little if any secondary muscle involvement.
I used to do these in my power rack. Just put the bar catches on the outside of the rack at shoulder level while standing on a calf raise block. Position the calf raise block so that you are leaning slightly forward. This allows the bar to slide up and down the uprights - and yes, you'll scratch the paint.
Doing calf raises this ways was okay, but occasionally I would lean left or right taking some stress off of my calves and onto my upper body.
I started to research new standing calf raise machines, but they start at $299 for a decent one, and they take up valuable space.
During one search I ran across this homemade version:
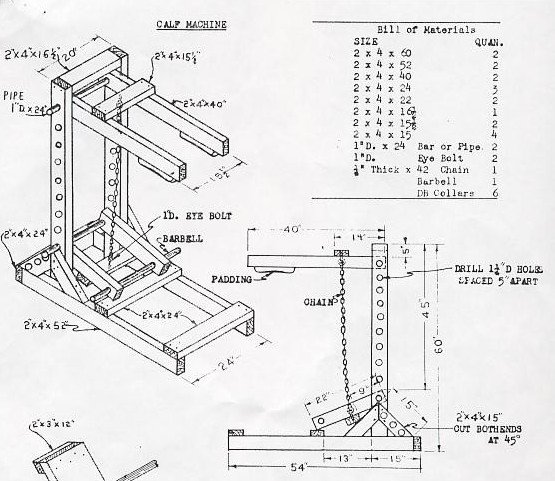
Now, this is a very cool design! I found this on davedraper.com, an excellent website. With a few modifications, this design would work great with my powertec rack.
Once again I headed off to a home improvement center, and I built a homemade calf raise machine for $65.
I've included an exploded view, pdf file of this project. If you are having trouble viewing this, please open your adobe reader and refresh this page.
List of materials needed:
|
2 2 2 1 1 1 1 1 1 4 1 1 Misc. |
2" x 4" x 6' boards 5/16" eyebolts/nuts 5/16" connecting links 1" pipe cap tube of red thread locker 1" x 12" black pipe nipple 3/4" x 36" length of pipe conduit 48" length of 5/16" chain 1" pipe flange pieces of 2" foam yard of black material to cover foam 1-1/2" x 11" length of PVC hardware and paint |
6 6 9 5 6 4 10 5 6 4 1 $1? $2? |
|
Total |
65 |
I always buy the best cuts of wood and try to find the straightest boards. This makes the projects easier and the finished product more aesthetically pleasing.
Cut the 2 x 4 boards to the sizes indicated. Drill a one inch hole in both of the 36" boards using a spade bit. This hole should be directly in the center and 1 1/2" from the end.
Assemble the remaining 2" x 4" pieces as shown. I used three, 2" wood screws at most fastening points for added durability.
Drill a 3/8"; clearance hole for the 5/16"; eyebolt directly in the center of the 12 1/2" 2 x 4.
Push the eyebolt through and secure it with a flat washer, lock washer and nut.
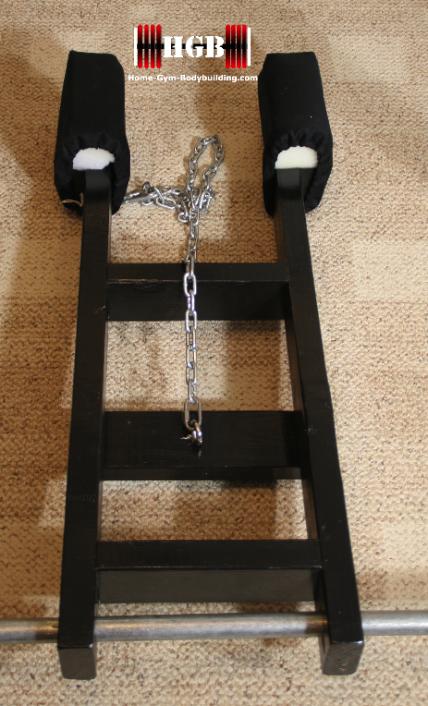
I designed this so it fits a variety of shoulder widths (my wife and children use this), so it’s only 9 1/2" wide. You may need to make adjustments to the plans if you have really wide shoulders.
I added on the end two 7" wood blocks, with foam, so it rests more comfortably on my shoulders. This part of the calf raise machine is ready for sanding, primer and spray paint.
The Olympic plate holder is made out of 1" black pipe. Drill a 3/8" hole through the 1" pipe cap to allow the eyebolt to go through. Secure the eyebolt with the hardware as shown. I also used red thread locker here as well.

Hand tighten the 1" pipe cap, 1" x 12" black nipple and the 1" pipe flange. Measure from the bottom of the pipe cap to the pipe flange, and this the measurement you cut the 1 1/2" PVC. My length of PVC measured 10 3/4". Slip the PVC over the pipe and tighten the whole assembly. Once again I used the red thread locker to make sure no connections come loose.
Olympic plates have a 1 15/16" hole in the center, and they fit over the 1" pipe cap with ease, but could slide around on the 1" pipe so I added the PVC to take away some plate movement. Worked really well!
The last step was to take the 3/4" x 36" pipe conduit, which has a 1" outer diameter, and run it through the holes in the power rack and through the calf raise machine. You might need to do a little sanding so it runs through smoothly.
I'm not sure what the capacity of this setup is, but I've had 350 pounds on it with no problems.
This design works really well, is adjustable for different heights, and can also be used for shrugs or standing/seated overhead presses.

Recent Articles
-
Bench Press Full Set
Jul 06, 22 01:48 PM
Weights/Bar/bench/clamps/safety bars,etc! Everything is included and is In VERY good condition! About 300lbs of weight along with a adjustable/removable -
Eleiko Olympic training bar
Sep 20, 21 02:39 PM
Bar has been used less than one year. It is in superb shape. Same bar new is almost $1,000 dollars. Selling for 800.00.I Have the tube to ship it. Razor4wolverines@yahoo.co -
Olympic weights
Jul 07, 21 05:35 PM
I have 395 pounds of weight Including the barbell. 4)45 2)35 2)25 2)10 4)5 4)2.5 contact: Guadron193@gmail.com


