Homemade T Bar Row Machine
Homemade T Bar Row Machine article and photos by Alan Valancy.
This venture cost somewhere around $60. Initially I shopped around for one of these machines, and the cheapest was around $150 through a private party. A new one would've been a lot more. And so, not having $150 either, I figured I'd try and make my own. Hell, what are a lot of these gym devices but poles and beams and the like fastened together in certain ways?

With me, a lot of the drive to endeavor upon these projects is to find out if I could see it through. With the given amount of space my garage affords me, I must choose carefully - quite carefully - as to just what I feel I really should have in there.


The metal part I suppose was the most experimental. All in all, I'm a pretty rookie carpenter, so this whole thing was one big experiment, much of the process being really tougher than it should have been, while other sections of the project went smoothly.

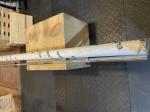
I special ordered one of those "all-rounder" bike handlebars seeing as it looked like just the right thing for the horizontal bar, and also, since I wanted parallel handles too, I rigged up conventional galvanized piping and affixed it all to a 3/4" pipe using bolts.

Now also, I used a flat square of metal in order to bolt the handles to the pipe in such a manner as to keep it all in place, despite loads. That was the initial design challenge. If you'll note from the pix, the plate of metal is arranged like a diamond, so as to give firm bolting to the set of handles.
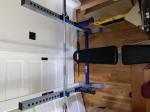
The weight plates slide onto a 1 - 1/2" length of pipe, and that screw into a bell reducer coupler so as to adapt to the 3/4" pipe. This is what I figure as the main component of the project. This can either hook up to a stand-alone base, as some T-Bar rowers are, or it can be attached to a cage.

The wooden component was certainly a unique challenge as well, consisting of an angled ramp of MDF affixed to "risers" of 2x6 cuts. The rest of the base is a 4x4 that the metal component hinges off of, and finally, another small length of 4x4 screwed into a routed-out dado in the 4x4 base.
This serves as the padded "bumper" for the pole to collide with if necessary. This passed through the MDF by way of an angled hole, which turned to be unnecessary, really, considering that the bumper could've been placed further up. That part really amounted to nothing more than I guess a practice with my jigsaw, just to see if I could do it, given the somewhat elaborate angles involved. Still, earlier into the project, I did figure that the bumper needed to be within the range of the ramp.
I think that more than anything I should stress that there is probably hardly any limit to the different designs that one could come up with for such ventures, but, hey, in this case, I haven't seen anyone else try a T-Bar rower, start to finish.
My earlier submissions for this site reflect my first attempts at this sort of thing, and I think that the #1 rule is to KEEP IT SIMPLE. Much of earlier stuff was way too complicated.

When you're working out that design, and - hopefully - drawing up material in advance, strive to keep the design as basic as possible. My projects have been getting more elaborate gradually, but I always try to keep things simple. It's too easy to get swept away in the designing process and get all lost in different directions. And let's all hope that the work pays off and the thing does what it's supposed to do. And even if it doesn't, it'll be a learning experience.


Recent Articles
-
Bench Press Full Set
Jul 06, 22 01:48 PM
 Weights/Bar/bench/clamps/safety bars,etc! Everything is included and is In VERY good condition! About 300lbs of weight along with a adjustable/removable
 -
Eleiko Olympic training bar
Sep 20, 21 02:39 PM
 Bar has been used less than one year. It is in superb shape. Same bar new is almost $1,000 dollars. Selling for 800.00.I Have the tube to ship it. Razor4wolverines@yahoo.co
 -
Olympic weights
Jul 07, 21 05:35 PM
I have 395 pounds of weight Including the barbell. 4)45 2)35 2)25 2)10 4)5 4)2.5 contact: Guadron193@gmail.com